This page shows how to use of glUAE by means of practical examples. The amount of information might make it seems that glUAE is complicated, but it is just that there are lots of options (and lots of power) that can be exploited through few basic-user operations.
1. QUICKSTART
2. FLOPPY-BASED APPLICATIONS
3. HARDFILE-BASED APPLICATIONS
4. WHDLOAD-READY APPLICATIONS
5. AmigaDOS-BASED APPLICATIONS
6. AmigaDOS-BASED APPLICATIONS WITH THE CENTRALIZED SYSTEM
7. CLASSIC AmigaOS
8. SINGLE-FILE APPLICATIONS
9. SPLASH SCREENS
Probably the idea that firstly and mostly strikes the imagination of users is launching games residing in floppy images by just double-clicking on them.
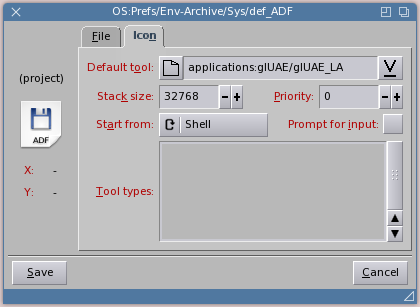
The quickest solution is to define a project DefIcon for each image type desired (e.g. .adf), with the settings shown in this picture:
|
→ glUAE_LA is one of the scripts of glUAE ("LA" stands for "Launch Application"). → The scripts path is chosen by the user during the installation. → The icon settings ( Default Tool: glUAE_LA; Start from: Shell; Prompt for input: no) are the same for any application in any form, except that in the cases described here glUAE_LA is replaced by other scripts.
|
This way, each time an .adf image is opened from Workbench (even indirectly, e.g. through WBRun), UAE is started with the image mounted to DF0: and the next 1, 2 or 3 images in the same directory mounted to DF1:-DF3: in alphabetical order.
However, this only barely scratches the surface (and, emulation-wise, might give unsatisfying results in some cases, as .uaerc could be unsuitable): glUAE offers much more power and control.
This section demonstrates how to launch an application coming on a floppy image using the oldschool demo Groovy by Lemon (its image Groovy.dms is available on Aminet).
The demo will be ready to run in a Workbench window after:
|
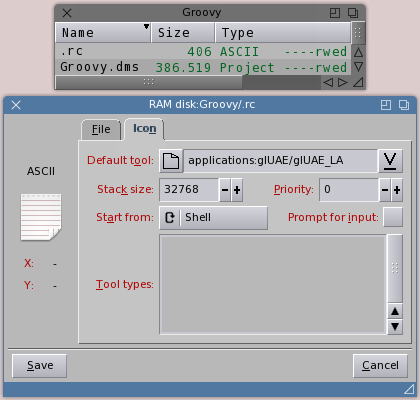
→ The directory, the UAE configuration and the icon are all optional for any application in any form. → The name of the directory can be any. → The UAE configurations file extension must be .rc. → The icon can be associated to any of the files or even to nothing at all. |
A complete installation would look like this:
Launching the demo is simply a matter of double-clicking the icon. Of course, anything that is equivalent to a double-click has the same effect - e.g. these shell commands:
WBRun .rc
.rc
RAM:Groovy/.rc
|
→ The icon is associated to .rc. → In the first 2 examples, the current directory is RAM:Groovy. → In the last example, the path is fully specified, thus the current directory can be any. → In the last 2 examples, the system environment variable VIEWER is set to WBRun. |
When there is no icon, it is possible to launch the demo by invoking directly the script glUAE_LA, whose argument can be any file belonging to the directory or even just the directory itself. Here are a few equivalent examples:
glUAE_LA .rc
glUAE_LA Groovy.dms
glUAE_LA ""
glUAE_LA RAM:Groovy/.rc
glUAE_LA RAM:Groovy/Groovy.dms
glUAE_LA RAM:Groovy
|
→ glUAE_LA is in the commands path. → In the first 3 examples, the current directory is RAM:Groovy. → In the last 3 examples, the path is fully specified, thus the current directory can be any. |
There are also many other possibilities: the Workbench menu, AmiDock, keyboard shortcuts, user scripts, etc. can all be used to launch the demo. Basically, anything that allows the execution of scripts is suitable.
|
→ All the launch methods apply to any application in any form; → .uaerc is loaded first; → The settings in .rc override the same settings specified in .uaerc; → .rc is optional, but often it is necessary to achieve a working/decent emulation; → .rc can be provided for any application in any form; → All the UAE configurations in this page are relative to this .uaerc. |
3. HARDFILE-BASED APPLICATIONS
The case of applications residing in hardfiles is similar to that of floppy-based applications, except that:
The hardfile mounted is the specific hardfile passed as input or, if none is specified:
10 and 32,1,2,512 as geometry.
|
→ Hardfiles need to be bootable and to include proper boot code. → Different geometries can be specified in the hardfiles file comments as per the UAE-defined format. |
No special operation is required to launch an application that is WHDLoad-ready: when glUAE detects the presence of a slave, it automatically starts the emulation ensuring that the application is run through WHDLoad.
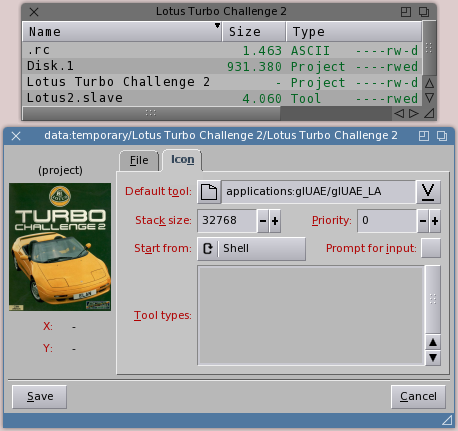
E.g. after adding the icon and the .rc fileexample, an installation of the game Lotus Turbo Challenge 2 would look like this:
In general, the slave fed to WHDLoad is the specific slave passed as input or, if none is specified:
PRELOAD as arguments.
| → If the S/startup-sequence file already exists at launch, none of the aforesaid operations is performed, so that the user can freely define a custom startup code (e.g. to pass WHDLoad other arguments). |
5. AmigaDOS-BASED APPLICATIONS
With the help of a hard disk-installed copy of AMOS Professional, this section explains how to prepare an application residing in ordinary AmigaDOS files.
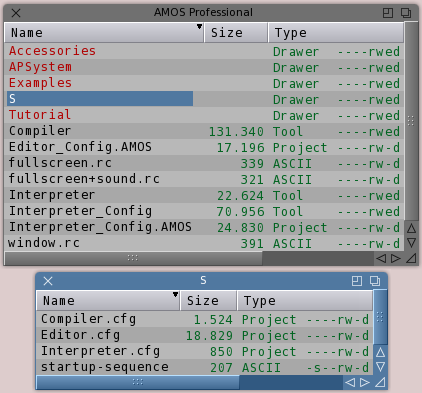
Assuming that the development suite resides in a directory called AMOS_Professional (containing the directories Accessories, APSystem, etc. and the executable files), the steps required to get AMOS Professional ready to run are:
| → The S/startup-sequence file is optional - if not provided, at launch glUAE asks the file to launch first and then creates the S/startup-sequence file accordingly. |
More often than for games and demos, the usage requirements of applications may vary from time to time. Taking care of this is as easy as creating multiple UAE configurations for all the needs. At launch, a requester will ask which to use, as shown in the following picture:

To have the possibility of choosing whether to run AMOS Professional in a window or in a screen (optionally with sound), it has been enough to add the UAE configurations window.rc, fullscreen.rc and fullscreen+sound.rc.
| → Multiple UAE configurations can be specified for any application in any form. |
6. AmigaDOS-BASED APPLICATIONS WITH THE CENTRALIZED SYSTEM
The previous section illustrated that applications (partially) relying on AmigaOS require some system components to be in their own directory. That, unfortunately:
The obvious and ideal solution would be having a single, centralized operating system somewhere and getting all the applications to refer to it (which is exactly what operating systems are for). glUAE makes it possible.
On the system side, the user has to:
| → The system files in the application directory has priority over those in the centralized system. E.g. if an application needs to use a particular version of icon.library, it can have the file Libs/icon.library in its directory. |
By exploiting this feature, the AMOS Professional installation considered in the previous section reduces to this:
(i.e. only the S directory remains).
From glUAE's point of view, AmigaOS is nothing but an AmigaDOS-based application, so, to have it transparently launchable, it is sufficient:
| → A full AmigaOS makes for a perfect centralized system. |
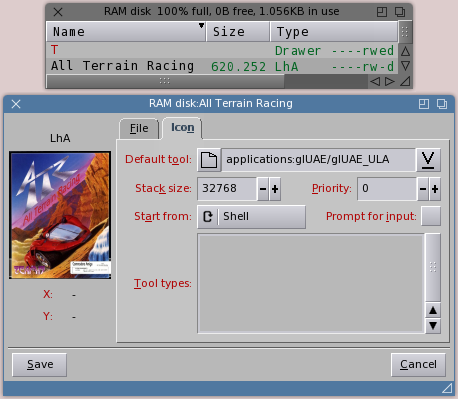
glUAE gives the possibility of launching any application in any form from a single file containing all the application files. This section demostrates how using the game All Terrain Racing, which comes on 2 floppy images.
The steps are:
Default Tool.
|
→ "ULA" stands for "Unpack and Launch Application". → The archive file name extension can be any or omitted altogether. |
A complete installation would look like this:
The game can be launched with any method which directly addresses the archive.
A fundamental thing to bear in mind is that the archives are unpacked to a temporary location before execution, so any modification made by the applications affect only the temporary files, not the original archive. To preserve the changes (in this case, e.g. the high scores) all that is needed is to specify the script glUAE_ULASD ("Unpack, Launch Application and Save Data") in place of glUAE_ULA;
For each application, glUAE allows to define a set of splash screens, which are shown upon launch by means of MultiView.
To define a splash screen it is sufficient to put an appropriately named file in the application directory.
There are 3 kinds of splash screens:
|
→ Any combination of splash screens can be used. → The order splash screens are shown in is: first-launch, blocking, normal. → The acceptable file types are those supported by MultiView. |
